When an organization enables support for Microsoft Defender for Endpoint in Intune, it establishes a service-to-service connection between Microsoft Intune and Microsoft Defender for Endpoint. The organization can then onboard to Microsoft Defender for Endpoint the devices it manages with Intune. Onboarding, in turn, enables the collection of data about device risk levels.
The prior unit examined how to enable Microsoft Defender for Endpoint and configure it for integration with Intune. This unit continues with this integration process. It examines the following steps to onboard devices and configure compliance and conditional access policies:
- Onboard devices that run Android, iOS/iPadOS, and Windows 10/11.
- Use compliance policies to set device risk levels.
- Use Compliance Access policies to block devices that exceed your expected risk levels. NoteAndroid and iOS/iPadOS devices use app protection policies that set device risk levels. App protection polices work with both enrolled and unenrolled devices.
The following sections outline these steps.
Onboard Windows devices
After an organization connects Intune and Microsoft Defender for Endpoint, Intune receives an onboarding configuration package from Microsoft Defender for Endpoint. The organization then uses a device configuration profile for Microsoft Defender for Endpoint to deploy the package to its Windows devices.
The configuration package configures devices to communicate with Microsoft Defender for Endpoint services to scan files and detect threats. The devices also report their risk levels to Microsoft Defender for Endpoint. The risk levels are based on the organization’s compliance policies.
Note
After onboarding a device using the configuration package, you don’t need to do it again.
Organizations can also onboard devices using:
- Endpoint detection and response (EDR) policy. Intune EDR policy is part of endpoint security in Intune. EDR policies can configure device security without the overhead of the larger body of settings found in device configuration profiles. EDR policy also works with tenant-attached devices. Organizations use Configuration Manager to manage these devices.When an organization configures an EDR policy after connecting Intune and Microsoft Defender for Endpoint, the policy setting Microsoft Defender for Endpoint client configuration package type has a new configuration option: Auto from connector. With this option, Intune automatically gets the onboarding package (blob) from your Defender for Endpoint deployment, replacing the need to manually configure an Onboard package.
- Group policy or Microsoft Endpoint Configuration Manager.
Warning
Some organizations use multiple policies or policy types to manage the same device settings (such as onboarding to Microsoft Defender for Endpoint). For example, they may use both a device configuration policy and an endpoint detection and response policy. This practice can result in policy conflicts for devices. To learn more about conflicts, see Manage conflicts.
Create the device configuration profile to onboard Windows devices
- You must begin by navigating to the Microsoft Intune admin center. To do so, on the Microsoft 365 admin center, select Show all in the navigation pane. Under the Admin centers group, select Endpoint Manager.
- In the Microsoft Intune admin center, select Endpoint security in the left-hand navigation pane.
- In the Endpoint security | Overview page, under the Manage section in the middle pane, select Endpoint detection and response.
- In the Endpoint security | Endpoint detection and response page, select +Create Policy on the menu bar.
- In the Create a profile pane that appears, select Windows 10 and Later in the Platform field.
- In the Profile field, select Endpoint detection and response.
- Select Create. Doing so initiates the Create profile wizard.
- In the Create profile wizard, on the Basics tab, enter a Name and Description (optional) for the profile, and then select Next.
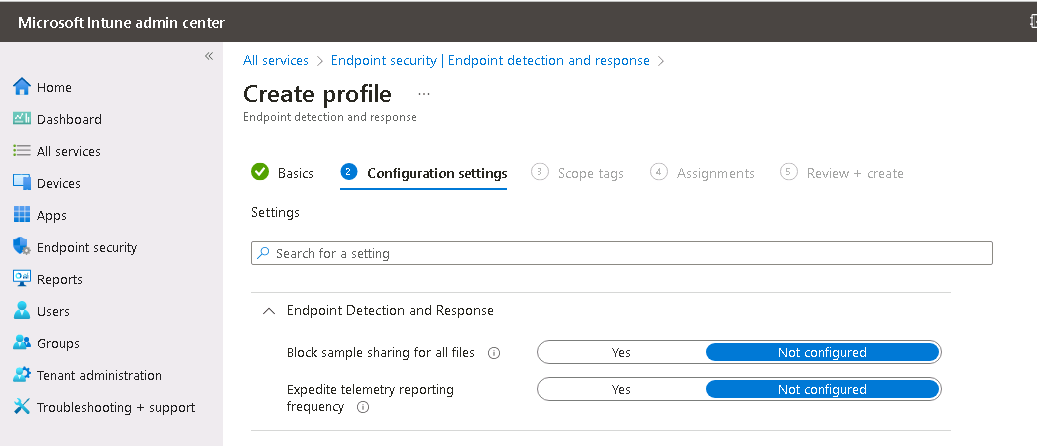
- On the Configuration settings tab, configure the following options for Endpoint Detection and Response and then select Next:
- Block sample sharing for all files. Setting this option to Yes blocks the collection and sharing of sample files with Microsoft for analysis purposes. When an Intune-managed device has the EDR feature enabled, Microsoft Defender for Endpoint can collect sample files that trigger detections on the device, and then share those files with Microsoft. These sample files can help Microsoft improve the accuracy of threat detection and response capabilities. However, if you set this option to Yes in the EDR policy, the system doesn’t collect or share sample files with Microsoft. It’s worth noting that this option may impact the accuracy and effectiveness of threat detection and response on the device. Therefore, Microsoft recommends that you carefully evaluate the potential benefits and drawbacks of enabling or disabling this option before making a decision.Expedite telemetry reporting frequency. For devices that are at high risk, set this option to Yes. Doing so directs Intune to report telemetry to the Microsoft Defender for Endpoint service more frequently.

- On the Scope tags tab, select Next. Scope tags are optional.
- On the Assignments tab, select the groups to receive this profile. For more information on assigning profiles, see Assign user and device profiles. When an organization deploys users to user groups, a user must sign-in on a device before the policy applies and the device onboards to Microsoft Defender for Endpoint. Select Next.
- On the Review + create page, select Create once you finish reviewing and verifying the details. The new policy should appear in the list of EDR policies. If it doesn’t immediately appear, select the Refresh option on the menu bar.
Onboard macOS devices
After you establish the service-to-service connection between Intune and Microsoft Defender for Endpoint, you can onboard macOS devices to Microsoft Defender for Endpoint. Onboarding configures devices to communicate with Microsoft Defender Endpoint, which then collects data about devices risk level.
Additional reading. For more information on configuration guidance for Intune, see Microsoft Defender for Endpoint for macOS.
For more information about onboarding macOS devices, see Microsoft Defender for Endpoint for Mac.
Onboard Android devices
After you establish the service-to-service connection between Intune and Microsoft Defender for Endpoint, you can onboard Android devices to Microsoft Defender for Endpoint. Onboarding configures devices to communicate with Defender for Endpoint, which then collects data about the devices risk level.
There isn’t a configuration package for devices that run Android. Instead, see Overview of Microsoft Defender for Endpoint for Android for the prerequisites and onboarding instructions for Android. For devices that run Android, you can also use Intune policy to modify Microsoft Defender for Endpoint on Android.
Additional reading. For more information, see Microsoft Defender for Endpoint web protection.
Onboard iOS/iPadOS devices
After you establish the service-to-service connection between Intune and Microsoft Defender for Endpoint, you can onboard iOS/iPadOS devices to Microsoft Defender for Endpoint. Onboarding configures devices to communicate with Defender for Endpoint. It then collects data about the devices risk level.
There isn’t a configuration package for devices that run iOS/iPadOS. Instead, see Overview of Microsoft Defender for Endpoint for iOS for prerequisites and onboarding instructions for iOS/iPadOS.
For devices that run iOS/iPadOS (in Supervised Mode), there’s specialized ability given the increased management capabilities provided by the platform on these types of devices. To take advantage of these capabilities, the Defender app must know whether a device is in Supervised Mode. Intune allows you to configure the Defender for iOS app through an App Configuration policy (for managed devices). As a best practice, this policy should target all iOS Devices. In this example, you create a policy for Microsoft Word.
- Navigate to the Microsoft Intune admin center as previously instructed.
- In the Microsoft Intune admin center, select Apps in the left-hand navigation pane.
- On the Apps | Overview page, under the Policy section in the middle pane, select App configuration policies.
- On the Apps | App configuration policies page, select +Add on the menu bar. In the drop-down menu that appears, select Managed devices. Doing so initiates the Create app configuration policy wizard.
- In the App configuration policy wizard, on the Basics tab, enter a policy Name and Description (optional).
- In the Platform field, select iOS/iPadOS.
- Next to Targeted app, select the Select app link.
- In the Associated app pane that appears, select Word and then select Next.
- Select Next.
- On the Settings tab, set the Configuration settings format to Use configuration designer.
- In the Configuration key field that appears, enter issupervised.
- In the Value type field, select String.
- In the Configuration value field, enter {{issupervised}}.
- Select Next on the Settings tab.
- On the Assignments tab, select the groups to receive this profile. For this scenario, select +Add all devices on the menu bar under Included groups. It’s a best practice to target all devices. When an administrator deploys a user to user groups, a user must sign-in on a device before the policy applies.
- Select Next on the Assignments tab.
- On the Review + create page, select Create once you finish reviewing and verifying the details. The new policy should appear in the list of app configuration policies. If it doesn’t immediately appear, select the Refresh option on the menu bar.
Additional reading. For more information on assigning profiles, see Assign user and device profiles.
For devices that run iOS/iPadOS (in Supervised Mode), Microsoft’s Defender for iOS team has made available a custom.mobileconfig profile to deploy to iPad/iOS devices. This profile analyzes network traffic to ensure a safe browsing experience, which is a feature of Microsoft Defender for iOS.
- Select this link to download the “.mobileconfig” profile: https://aka.ms/mdatpiossupervisedprofile.
- Navigate to the Microsoft Intune admin center as previously instructed.
- In the Microsoft Intune admin center, select Devices in the left-hand navigation pane.
- On the Devices | Overview page, under the Policy section in the middle pane, select Configuration profiles.
- On the Devices | Configuration profiles page, select +Create profile on the menu bar.
- In the Create a profile pane that appears, select iOS/iPadOS in the Platform field. Doing so initiates the Create app configuration policy wizard.
- In the App configuration policy wizard, on the Basics tab, enter a policy Name and Description (optional).
- In the Platform field, select iOS/iPadOS.
- In the Profile type field, select Templates. In the template list that appears, select Custom, and then select Create. Doing so initiates the Custom wizard.
- In the Custom wizard, on the Basics tab, enter a profile Name and Description (optional), and then select Next.
- On the Configuration settings tab, enter a Custom configuration profile name.
- In the Select a configuration profile file field, select the file icon next to the field. In the File Explorer window that appears, locate and select the “.mobileconfig” file that you downloaded in the first step in this exercise. The system should display the code from this file in the text box that appears under the file name.
- Select Next on the Configuration settings tab.
- On the Assignments tab, select the groups to receive this profile. For this scenario, select +Add all devices on the menu bar under Included groups. It’s a best practice to target all devices. When an administrator deploys a user to user groups, a user must sign-in on a device before the policy applies.
- Select Next on the Assignments tab.
- On the Review + create page, select Create once you finish reviewing and verifying the details. The new policy should appear in the list of app configuration policies. If it doesn’t immediately appear, select the Refresh option on the menu bar.
Create and assign compliance policy to set device risk level
For Android, iOS/iPadOS, and Windows devices, the compliance policy determines the level of risk that an organization considers as acceptable for its devices. Microsoft Defender for Endpoint performs the actual risk level assessment for each device, using the compliance policy as one of its assessment factors.
When an administrator creates a compliance policy in Microsoft Intune to set the device risk level, they define the criteria the device must meet to comply with their organization’s security standards. The compliance policy evaluates the device’s current state against these criteria. It then generates a compliance report, which it sends to Microsoft Defender for Endpoint.
Microsoft Defender for Endpoint then analyzes the compliance report, along with other security data and threat intelligence, to determine the overall risk level of the device. The risk level is based on a wide range of factors, including:
- The device’s compliance status
- The device’s software and hardware configuration
- Network activity
- Other indicators of potential security threats
In summary:
- The compliance policy defines the criteria for device compliance.
- Microsoft Defender for Endpoint performs the actual assessment of the device’s risk level.
- Microsoft Intune deploys and enforces the policy on the device.
If you’re not familiar with creating a compliance policy, reference the Create a policy procedure from the Create a compliance policy in Microsoft Intune article. The following information is specific to configuring Microsoft Defender for Endpoint as part of a compliance policy:
- Navigate to the Microsoft Intune admin center as previously instructed.
- In the Microsoft Intune admin center, select Devices in the left-hand navigation pane.
- On the Devices | Overview page, under the Policy section in the middle pane, select Compliance policies.
- On the Compliance policies | Policies page, select +Create profile on the menu bar.
- In the Create a policy pane that appears, select in the Platform field and then select one of the platforms from the drop-down menu that appears. Select Create. Doing so initiates the [selected platform] compliance policy wizard.
- In the [selected platform] compliance policy wizard, on the Basics tab, enter a policy Name and Description (optional). Select Next.
- On the Compliance settings tab, expand the Microsoft Defender for Endpoint group. Select the Require the device to be at or under the machine risk score field. In the drop-down menu that appears, select your preferred level. For more information, see Microsoft Defender for Endpoint determines threat level classifications.
- Clear. This level is the most secure. The device can’t have any existing threats and still access company resources. Microsoft Defender for Endpoint assesses devices with any threats as noncompliant. (Microsoft Defender for Endpoint uses the value Secure.)
- Low. The device is compliant if only low-level threats exist. Microsoft Defender for Endpoint assesses devices with medium or high threat levels as noncompliant.
- Medium. The device is compliant if the threats found on the device are low or medium. Microsoft Defender for Endpoint assesses devices with high threat levels as noncompliant.
- High. This level is the least secure and allows all threat levels. The policy classifies devices with high, medium, or low threat levels as compliant.
- Select Next on the Compliance settings tab.
- On the Actions for noncompliance tab, add the sequence of actions on noncompliance devices. Note the default action titled Mark device noncompliant, which Microsoft Defender for Endpoint performs immediately after assessing a device as noncompliant. You can optionally change the Schedule for this action if you don’t want the action taken immediately. Add any other noncompliant actions as required by your organization, and then select Next.
- On the Assignments tab, select the groups to receive this profile. For this scenario, select +Add all devices on the menu bar under Included groups. It’s a best practice to target all devices. When an administrator deploys a user to user groups, a user must sign-in on a device before the policy applies.
- Select Next on the Assignments tab.
- On the Review + create page, select Create once you finish reviewing and verifying the details. Once the system creates the policy, a window appears for the newly created policy.
Create and assign app protection policy to set device threat level
When you create an app protection policy for a protected app, Microsoft Intune deploys the policy to the device. The Microsoft Intune App Protection service then enforces the policy. However, Microsoft Defender for Endpoint performs the assessment of the device’s threat level. To do so, it continuously monitors the device for potential security threats and vulnerabilities.
The app protection policy helps to protect the app and its data on the device, but it doesn’t directly impact the device’s threat level assessment. Rather, Microsoft Defender for Endpoint determines the device’s threat level based on a wide range of factors, including:
- Threat intelligence
- Behavioral analysis
- Other security data collected and analyzed by the Microsoft Defender for Endpoint service.
In summary:
- Microsoft Intune deploys and enforces the app protection policy.
- Microsoft Defender for Endpoint assesses the device’s threat level.
Review the procedure on how to create an application protection policy for either iOS/iPadOS or Android. Then use the following information on the Apps, Conditional launch, and Assignments pages:
- Apps. Select the apps that you want the app protection policies to target. An administrator can then either block or selectively wipe these apps based on the device risk assessment from your chosen Mobile Threat Defense vendor.
- Conditional launch. Under Device conditions, use the drop-down box to select Max allowed device threat level. Select one of the following options for the threat level Value:
- Secured. This level is the most secure. The device can’t have any threats present and still access company resources. Microsoft Defender for Endpoint assesses devices with any threats as noncompliant.
- Low. The device is compliant if only low-level threats are present. Microsoft Defender for Endpoint assesses devices with medium or high threat levels as noncompliant.
- Medium. The device is compliant if the threats found on the device are low or medium level. Microsoft Defender for Endpoint assesses devices with high threat levels as noncompliant.
- High. This level is the least secure and allows all threat levels, using Mobile Threat Defense (MTD) for reporting purposes only. Devices must have the MTD app activated with this setting.Select one of the following recommended options for the administrator to perform based on the threat level Action:
- Block access
- Wipe data
- Assignments. Assign the policy to groups of users. Intune app protection evaluates the devices used by the group’s members for access to corporate data on targeted apps.
Important
If you create an app protection policy for any protected app, Microsoft Defender for Endpoint assesses the device’s threat level. Depending on the configuration, Microsoft Intune either blocks or selectively wipes (through conditional launch) the devices that don’t meet an acceptable level. Blocked devices can’t access corporate resources until the chosen MTD vendor resolves the threat on the device and reports it to Intune.
Create a Conditional Access policy
When devices exceed the threat level set by their organization, the Conditional Access service in Azure Active Directory can block their access to corporate resources, such as SharePoint Online or Exchange Online. This service enforces Conditional Access policies for Microsoft 365 and other Microsoft cloud services. When Microsoft Defender for Endpoint deems a device noncompliant, the Conditional Access service receives a notification and can take action to block access to corporate resources for that device.
In summary:
- Microsoft Defender for Endpoint provides the threat intelligence and risk assessment data the Conditional Access service uses to determine whether a device is compliant.
- Microsoft Intune deploys compliance policies to devices and ensures they meet the required security standards.
- The Conditional Access service in Azure Active Directory blocks devices that exceed the threat level set by an organization.
Complete the following steps to create a conditional access policy based on device compliance:
- Navigate to the Microsoft Intune admin center as previously instructed.
- In the Microsoft Intune admin center, select Endpoint security in the left-hand navigation pane.
- On the Endpoint security | Overview page, under the Manage section in the middle pane, select Conditional Access.
- On the Conditional Access | Policies page, select +New policy on the menu bar.
- On the New page, enter a policy Name. Then define the Assignments and Access controls associated with the policy. For example:
- Under the Users section, select the 0 users and groups selected link. Use the Include or Exclude options that appear to add your groups to the policy.
- Under the Cloud apps section, select the No cloud apps, actions, or authentication context selected link. Use the Include or Exclude options that appear to add the apps this policy should protect. For example, select the Select apps option and then select the Select section. In the Select pane that appears, enter Office in the Search field, and then select Office 365 SharePoint Online and Office 365 Exchange Online. Select the Select button to save your changes.
- Under the Conditions section, select the 0 conditions selected link. In the list of conditions that appears, configure the conditions for the policy. For example, select Client apps to apply the policy to apps and browsers. In the Client apps pane that appears, set the Configure toggle switch to Yes. Note how the system automatically selects all the check boxes. Leave the Browser and Mobile apps and desktop clients check boxes selected, but select the other check boxes to unselect (clear) them. Select Done to save your changes.
- Under the Grant section, select the 0 controls selected link. In the Grant pane that appears, select whether to block or grant access based on device compliance. For example, select the Grant access option, and then select Require device to be marked as compliant. Choose Select to save your changes.
- Configure any other Assignments or Access controls for this Conditional Access policy.
- In the Enable policy setting, select Yes to enable the policy.
- Select Create once you finish reviewing and verifying the details. The new policy should appear in the list of Conditional Access policies. If it doesn’t immediately appear, select the Refresh option on the menu bar.